


In single-page applications, the users can access the content of the web application in a single HTML page and Angular provides useful features to develop navigation through the application. In some cases, the user is allowed to see the content based on specific conditions or we have to guard routes against unauthorized access.
There are 6 types of route guards available in Angular:
canActivate
canActivateChild
canDeactivate
canMatch
canLoad
resolve
In my article, I will present some examples of Angular canActivat guard, how to implement and use it in a project.
Guard to protect the route and redirect
Let's say, I have a dashboard, which contains two buttons, the first leads to the normal content, and with the second button, the user can navigate to the VIP content route, which has to be guarded and only subscribers can access that content. I won't implement the authentication, for now, a checkbox will determine, if the user has VIP access or not.
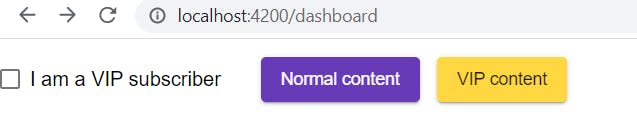
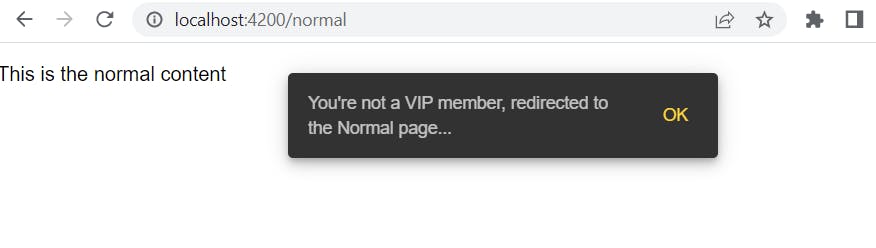
If the checkbox is unchecked means that the subscriber isn't VIP, the user can't access the VIP content and is redirected to the normal content's page with a popup describing the reason.
Create a new Angular project and generate our components, DashboardComponent, NormalComponent and VipComponent.
In the DashboardComponent, add two buttons, they will be the starting points for the navigation to the corresponding components.
<button mat-raised-button color="primary" (click)="onNormalClick()" class="basic-margin">Normal content</button>
<button mat-raised-button color="accent" (click)="onVipClick()" class="basic-margin">VIP content</button>
Let's set up the click actions in the .ts file. The Angular Router will navigate the user to the proper page:
  onNormalClick(): void {
    this.router.navigate(['/normal']);
  }

  onVipClick(): void {
    this.router.navigate(['/vip']);
  }
Now, we define the routes for our components in the routes configuration. We will protect the VipComponent with our VipRouteGuard.
import { NgModule } from '@angular/core';
import { RouterModule, Routes } from '@angular/router';
import { DashboardComponent } from './dashboard/dashboard.component';
import { VipRouteGuard } from './guard/vip.guard';
import { NormalComponent } from './normal/normal.component';
import { VipComponent } from './vip/vip.component';

const routes: Routes = [
  {
    path: '',
    pathMatch: 'full',
    redirectTo: 'dashboard'
  },
  {
    path: 'dashboard',
    component: DashboardComponent
  },
  {
    path: 'normal',
    component: NormalComponent
  },
  {
    path: 'vip',
    component: VipComponent,
    canActivate: [VipRouteGuard]
  }
];

@NgModule({
  imports: [RouterModule.forRoot(routes)],
  exports: [RouterModule]
})
export class AppRoutingModule { }
In this case, we have to implement a canActivate() method for our VipRouteGuard. If it returns true, the vip route can be activated and the navigation continues. If it returns false, then the new route has to be set by the Router and returns a UrlTree. This navigates the user to the normal route.
We don't have to subscribe to the observable, the canActivate() function just returns an Observable<boolean|UrlTree> in this example, and it will be subscribed automatically. The canActivate array in the routes configuration is used to assign guards, which implement the CanActivate interface, to the route.
import { Injectable } from "@angular/core";
import { MatSnackBar } from '@angular/material/snack-bar';
import { CanActivate, Router, UrlTree } from "@angular/router";
import { map, Observable } from "rxjs";
import { VipService } from "../service/vip.service";

@Injectable({
    providedIn: 'root'
})
export class VipRouteGuard implements CanActivate {
    constructor(
        private vipService: VipService,
        private router: Router,
        private snackbar: MatSnackBar
    ) { }

    canActivate(): Observable<boolean | UrlTree> {
        return this.vipService.isVip().pipe(
            map(res => {
                if (!res) {
                    this.snackbar.open('You\'re not a VIP member, redirected to the Normal page...', 'OK', {
                        duration: 3000,
                        verticalPosition: 'top'
                    });
                    return this.router.createUrlTree(['normal']);
                }
                return res;
            })
        );
    }
}
To determine if the user is vip or not, I just use a mock service (VipService), which will return true if the checkbox is checked. This method can be easily replaced by a proper API call.
isVip(): Observable<boolean> {
    // return this.currentVipStatus;
    // or implement here the logic
}
Use data from ActivatedRouteSnapshot
Angular's ActivatedRouteSnapshot displays information about a route associated with a component and represents its status at a certain moment of time. It contains information about the data belonging to the route as well. This is useful if we have one guard, but there are multiple routes with route-specific information that has to be taken into account while the guard evaluates the conditions.
Let's see an example of how we can use data from the ActivatedRouteSnapshot as the parameter of the canActivate() method.
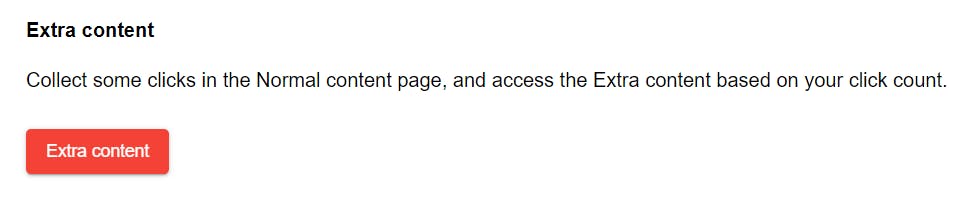
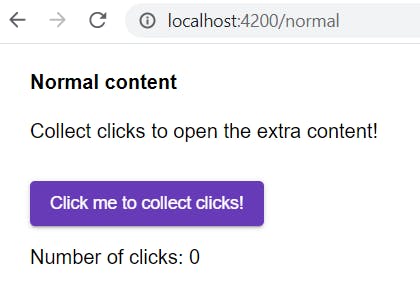
Add a new button to the dashboard with a new route to the Extra content page. This can be accessed only if the user clicks at least 5 times on the new button on the Normal content page.
Generate the new ExtraContentComponent and add the new path of extra-content to the Routes in the AppRoutingModule. In the data object define the necessary information, which will be accessed in the guard. If you have some static data, which affects the navigation, this is a good spot to use it.
The SomeService contains the counting logic, its observable stores the current number of clicks.
{
    path: 'extra-content',
    component: ExtraContentComponent,
    data: {
      requiredClicks: 5
    },
    canActivate: [ClickedRouteGuard]
  }
Implement the ClickedRouteGuard. The 'requiredClicks' will be found in the ActivatedRouteSnapshot's data, and now its value can be compared with the counter of the SomeService.
import { Injectable } from "@angular/core";
import { MatSnackBar } from '@angular/material/snack-bar';
import { ActivatedRouteSnapshot, CanActivate, UrlTree } from "@angular/router";
import { map, Observable } from "rxjs";
import { SomeService } from "../service/some.service";

@Injectable({
    providedIn: 'root'
})
export class ClickedRouteGuard implements CanActivate {
    constructor(
        private someService: SomeService,
        private snackbar: MatSnackBar
    ) { }

    canActivate(route: ActivatedRouteSnapshot): Observable<boolean> {
        return this.someService.currentNumberOfClicksObs.pipe(
            map(res => {
                if(route.data['requiredClicks'] <= res) {
                    return true;
                }
                this.snackbar.open(`Your clicks are not enough. You need atleast ${ route.data['requiredClicks']} clicks`, 'OK',
                {
                   duration: 3000,
                   verticalPosition: 'top'
                });
                return false;
            })
        );
    }
}
The canActivate() function can return Promises and simple boolean or UrlTree values as well.
Summing up
Angular Guards are tools to control user access to routes, based on specific conditions, namely we use them to check if the user has permission to visit the pages.
The usual test case is to stop the navigation if a non-authenticated user tries to access the route. But there are other use cases where a guard can come in handy: I've seen it protect the user from losing unsaved changes, block the user to use functionality that requires a different type of account or provides the user the possibility of watching a user's manual before using the new functionality.
I hope you will find these examples of guards useful for your work.
You can run the project using Stackblitz from here.
If you have questions feel free to add your comment or to open an issue in the GitHub repo.